Installing 64-bit Debian on a Raspberry Pi 4

The CPU in the Raspberry Pi 3 and 4 implements the 64-bit ARMv8 architecture. But Raspbian, the Debian-derived official operating system for Raspberry Pis, remains 32-bit-only to maximise compatibility across the generations.

I recently got a Raspberry Pi 4, and I'd like to use it for 64-bit ARM development. Various 64-bit Linux distributions have been shown running on the Raspberry Pi, but I wanted to stick to Debian which I know well. While some work has been done to add Raspberry Pi support to Debian, I haven't seen anyone claiming to have it working on the Raspberry Pi 4.

The pieces do exist to make this work. The Raspberry Pi Foundation has made a 64-bit kernel available for testing. Debian has good support for the arm64 architecture (i.e. the 64-bit instruction set of ARMv8) And it's not that hard to bootstrap a Debian system from scratch (if you know how). So I was able to get 64-bit Debian system running on my Raspberry Pi 4.

In outline, the process is:

  1. Put Raspbian onto a micro SD card.
  2. Update it with the 64-bit kernel made available for testing by the Raspberry Pi.
  3. Add a new partition to the SD card for Debian
  4. Bootstrap Debian into it by running debootstrap from another Linux system.

Detailed installation process

Install Raspbian onto a micro SD card

We're going to install Raspbian and Debian side by side on a single card, so you'll need one with enough space for that. I used a 64GB card, but 16GB should be enough.

Follow the normal process to install Raspbian onto the card. I installed the “Raspbian Buster with Desktop” edition, but Lite would probably work too.

Update to the 64-bit kernel

Put the card into the Raspberry Pi, and do the initial boot and setup as normal. Then follow these instructions to install and reboot into the 64-bit kernel.

Make another partition for Debian

With the 64-bit kernel in place, power down the Raspberry Pi and move the micro SD card back to another Linux system.

Installing Raspbian will have resulted in two partitions on the card: The first one is a small /boot partition with a FAT filesystem, and the second one is the main ext4 filesystem for the Raspbian system. We're going to shrink the Raspbian filesystem down, and then add a third partition for Debian.

I used gparted for this. Here's how the micro SD card looks to begin with (SD cards show up as /dev/sda on my laptop, but the device name might well be different for you):
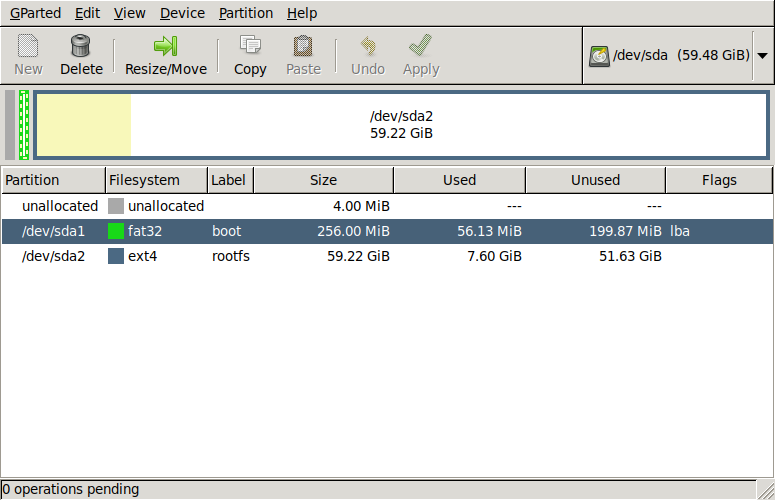
gparted screenshot before adding partition

And here's the end result after shrinking the Raspbian filesystem in /dev/sda2 and adding a new ext4 partition /dev/sda3 for Debian:
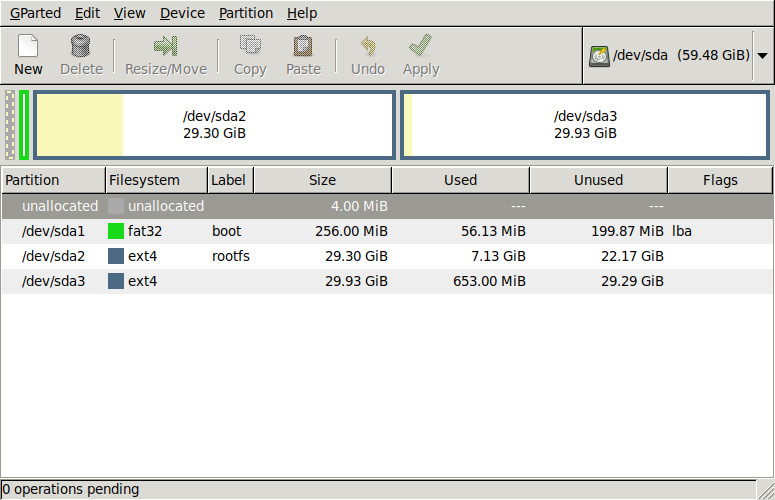
gparted screenshot after adding partition

Bootstrap the Debian system

We're going to create a bare-bones Debian system in the new partition using debootstrap. It's in the debootstrap package for Debian/Ubuntu/etc. (and packages are also available for some non-Debian-based Linux distros).

Below, # indicates commands to be run as root, or prefixed with sudo as appropriate.

Mount all the partitions from the card at convenient locations. On my system the relevant block devices are /dev/sdaN (they may be different on your system, so please check), so:

# mkdir /mnt/boot /mnt/raspbian /mnt/debian
# mount /dev/sda1 /mnt/boot
# mount /dev/sda2 /mnt/raspbian
# mount /dev/sda3 /mnt/debian

Now, run debootstrap:

# debootstrap --include=wpasupplicant,dbus --arch=arm64 --foreign buster /mnt/debian

That will download the packages for a minimal Debian system into the new partition. (The --include option makes sure we have the packages needed to get wifi working.)

Next, there are some critical files we need to copy across from the Raspbian partition:

# cp -a /mnt/raspbian/lib/modules /mnt/raspbian/lib/firmware /mnt/debian/lib/

We also need to copy /etc/fstab across from Raspbian, and edit it slightly:

# cp -a /mnt/raspbian/etc/fstab /mnt/debian/etc/fstab

The contents of /mnt/debian/etc/fstab should be something like:

proc            /proc           proc    defaults          0       0
PARTUUID=5e3da3da-01  /boot           vfat    defaults          0       2
PARTUUID=5e3da3da-02  /               ext4    defaults,noatime  0       1
# a swapfile is not a swap partition, no line here
#   use  dphys-swapfile swap[on|off]  for that

Edit the PARTUUID of the root filesystem line to change the suffix -02 to -03, so that it becomes:

PARTUUID=5e3da3da-03  /               ext4    defaults,noatime  0       1

Debootstrap puts the hostname of the machine you run it on into /etc/hostname, which can be confusing, so fix it up now:

# echo rpi >/mnt/debian/etc/hostname

If you configured wifi under Raspbian, then copy the settings over to make it easy to get it working under Debian:

# cp -a /mnt/raspbian/etc/wpa_supplicant/wpa_supplicant.conf /mnt/debian/etc/wpa_supplicant

One last step to prepare the card: We need to edit the cmdline.txt file in the boot partition that provides the kernel command line to the Raspberry Pi bootloader. Initially, the contents of /mnt/boot/cmdline.txt should be something like:

console=serial0,115200 console=tty1 root=PARTUUID=5e3da3da-02 rootfstype=ext4 elevator=deadline fsck.repair=yes rootwait quiet splash plymouth.ignore-serial-consoles

(You can make a copy of the original contents, so that you can restore it to boot Raspbian again from the same card.)

We need to edit /mnt/boot/cmdline.txt in two ways:

  1. Change the suffix of the root= setting from -02 to -03 (to tell it to boot from the Debian partition).
  2. Remove everything after rootwait (but keep rootwait).

For me, the result is:

console=serial0,115200 console=tty1 root=PARTUUID=5e3da3da-03 rootfstype=ext4 elevator=deadline fsck.repair=yes rootwait

Now we can unmount the partitions from the card, and do a couple of syncs for good luck, and then the card can be removed

# umount /mnt/boot /mnt/raspbian /mnt/debian ; sync ; sync

Finishing the bootstrap process on the Raspberry Pi

Put the card back into the Raspberry Pi, and power it up. It should boot in a few seconds, and if you press the enter key, you'll see a command prompt:
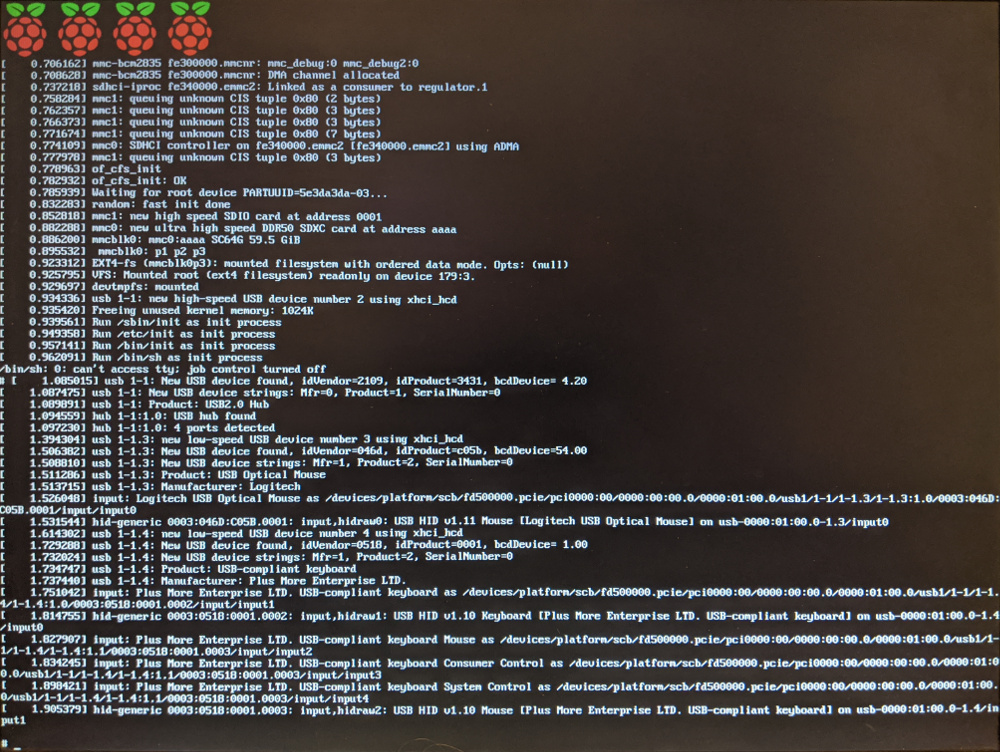
Photograph of the screen when the Raspberry Pi has booted

At this point, you just have a shell running and not much else available (and command history and tab completion won't work in the shell). To complete the Debian installation, we need to run the second stage of the bootstrapping process, by typing these commands:

# mount /proc
# mount -o remount,rw /dev/root /
# /debootstrap/debootstrap --second-stage

That last command might take several minutes. Then, set a root password:

# passwd
And reboot:
# mount -r -o remount -f /dev/root ; sync ; sync ; reboot -f

When it reboots this time, you should have a minimal but functional Debian system, with a normal login prompt.

To get wifi working, create /etc/network/interfaces.d/wlan0 containing:

auto wlan0
allow-hotplug wlan0
iface wlan0 inet dhcp
	wpa-conf /etc/wpa_supplicant/wpa_supplicant.conf

Then do

# ifup wlan0

Wrapping up

At this point, you should have a working 64-bit Debian system on your Raspberry Pi. But it's still a very minimal system, so you'll need to add packages, users, etc. to do much with it. Probably some things don't work, but I wasn't able to find anything obvious, even doing things like installing the full GNOME desktop environment.
A minimal KVM example

kvm-hello-world is a very simple example program to demonstrate the use of KVM. It acts as a very simple VM host, and runs a trivial real-mode program in a VM. I tested it on Intel processors with the VMX hardware virtualization extensions. It might work on AMD processors with AMD-V.

Background

KVM is the Linux kernel subsystem that provides access to hardware virtualization features of the processor. On x86, this means Intel's VMX or AMD's AMD-V. VMX is also known as VT-x; VT-x seems to be the marketing term, whereas VMX is used in the Intel x86 manual set.

In practice, KVM is often employed via qemu. In that case, KVM provides virtualization of the CPU and a few other key hardware components intimately associated with the CPU, such as the interrupt controller. qemu emulates all the devices making up the rest of a typical x86 system. qemu predates KVM, and can also operate independently of it, performing CPU virtualization in software instead.

But if you want to learn about the details of LVM, qemu is not a great resource. It's a big project with a lot of features and support for emulating many devices.

There's another project that is much more approachable: kvmtool. Like qemu, kvmtool does full-system emulation. unlike qemu, it is deliberately minimal, emulating just a few devices. But while kvmtool is impressive demonstration of how simple and clean a KVM-based full-system emulator can be, it's still far more than a bare-bones example.

So, as no such example seems to exist, I wrote one by studying api.txt and the kvmtool sources.

Notes

The code is straightforward. It:

  • Opens /dev/kvm and checks the version.
  • Makes a KVM_CREATE_VM call to creates a VM.
  • Uses mmap to allocate some memory for the VM.
  • Makes a KVM_CREATE_VCPU call to creates a VCPU within the VM, and mmaps its control area.
  • Sets the FLAGS and CS:IP registers of the VCPU.
  • Copies a few bytes of real mode code into the VM memory.
  • Makes a KVM_RUN call to execute the VCPU.
  • Checks that the VCPU execution had the expected result.

A couple of aspects are worth noting:

The test code runs in real mode because there is far less set-up needed to enter real mode, compared to protected mode (where it is necessary to set up the control registers and data structures to support segmentation, even with paging disabled), or 64-bit mode (where is it necessary to set up all the control register and data structures to support paging).

Note that initial Intel VMX extensions did not implement support for real mode. In fact, they restricted VMX guests to paged protected mode. VM hosts were expected to emulate the unsupported modes in software, only employing VMX when a guest had entered paged protected mode (KVM does not implement such emulation support; I assume it is delegated to qemu). Later VMX implementations (since Westmere aka Nehalem-C in 2010) include Unrestricted Guest Mode: support for virtualization of all x86 modes in hardware.

The code run in the VM code exits with a HLT instruction. There are many ways to cause a VM exit, so why use a HLT instruction? The most obvious way might be the VMCALL (or VMMCALL on AMD) instruction, which it specifically intended to call out to the hypervisor. But it turns out the KVM reserves VMCALL/VMMCALL for its internal hypercall mechanism, without notifying the userspace VM host program of the VM exits caused by these instructions. So we need some other way to trigger a VM exit. HLT is convenient because it is a single-byte instruction.

Pachuco on MIPS

Pachuco now has MIPS32 support, as anticipated in a previous post.

I had the MIPS32 support almost working early this year. But as I was doing some final testing, I noticed intermittent errors under some conditions: segfaults and other “shoudn't happen” errors. The pachuco bootstrapping process is intended to be deterministic: whether it completes without errors, and the resulting compiler binary if it does so, should only depend on the inputs to that process. But what are the inputs? The source files are the most obvious and significant part. But some other things can potentially have an impact. The HEAP_SIZE environment variable sets the size of the garbage-collected heap for the pachuco runtime. When things are working properly, this should not make a difference to program behaviour. But I found that for some values of HEAP_SIZE, the bootstrap would complete successfully, but other values would consistently result in crashes. As HEAP_SIZE affects at which points the GC runs, that suggests GC bugs.

The x86 and ARM targets didn't exhibit similar bugs, meaning that the problem was not in the GC itself, but rather in the generated MIPS32 code that calls into the GC. But after spending a while eyeballing the relevant code, I couldn't find it. Another approach to finding the cause would have been to debug a crash with gdb, but in the past I've found this approach to be a very slow process: problems in the GC can cause the program to go off the rails long after the GC was active.

So I decided to take a detour, and do some work to make it possible to track down GC issues more systematically. In the process of doing that, I found and fixed some latent bugs which affected the x86 and ARM, but those issues weren't responsible for the MIPS crashes. Once I had that working on the established platforms, I returned to the MIPS32 port, and spotted the bug almost immediately. It turned out to be one of those trivial but severe bugs that makes you wonder “how did this ever work?” — which is why it was easy to overlook.

So now pachuco has working MIPS32 support. I haven't yet updated the pachuco web site to talk about it though. That site hasn't received any attention in a long long time, so it needs a general overhaul.

Porting Pachuco to MIPS

A few months ago, Imagination Technologies announced that they were giving away MIPS Creator CI20 boards to open-source developers (Imagination acquired MIPS Technologies last year). The CI20 is a development board based on the Ingenic JZ4780 SoC, which includes a 1.2GHZ dual-core MIPS32 processor. Developers had to request a board by submitting a short proposal: I proposed to port my Pachuco Lisp dialect to MIPS, expecting that there was little chance of actually getting a board. So I was surprised when I got an email telling me that they had sent one to me. Now I am following through on my proposal, and I thought I'd write about the process as I go.

There are other hands-on reviews of the CI20, so I won't say much about the board itself, except to mention one nice feature: It has an 8MB flash chip on the board and comes loaded with Debian Wheezy, so I was able to get started with it straight away without going through the process of downloading an image and writing an SD card. But it's hard to recommend the board given that it is not actually available for purchase. I'm not sure what further plans Imagination has for these boards.

Pachuco

Pachuco started out as a minimal compiler targeting only x86-64/i386 (the differences between the two are minor). Later on I ported it to ARM. To give an idea of the work involved in targeting a new architecture, there are 750 non-whitespace lines in the two ARM-specific files. ARM and MIPS are both RISC instruction sets, so it seems like like it should be fairly straightforward to add support for MIPS code generation.

Pachuco was originally an exercise in strict minimalism: How simple can a Lisp compiler be, to be able to compile itself? But that goal is quite limited. For instance, Pachuco was able to bootstrap itself before it had a garbage collector. As no heap space was ever re-used, the heap would grow to several hundred MB, but that's hardly a lot of memory by today's standards. And the code generated by those early minimal versions of Pachuco had many obvious inefficiencies. So I succumbed to the temptation to elaborate it. The goal changed to making the compiler able to compile itself in as little time as possible. This is still a fairly minimalist approach. I've tried some optimizations only to throw the work away because they don't pay for themselves — they cost more cycles when compiling than they save through improvements for the generated code. But other enhancements are consistent with this goal, and today Pachuco has many of the features of a real Lisp system, including a GC and proper tail calls, and it implements classic techniques for efficient function calls and variable access.

The MIPS instruction set architecture

In order to re-target a compiler, you need to understand the target machine code well enough to know how to produce efficient sequences of instructions for the primitives generated by the machine-independent portion of the compiler. The only time I've done any development on a MIPS machine before this was a few hours on a SGI Indigo back in the mid 90s, and that didn't involve any low-level work. But I've been exposed to MIPS machine code through papers and books: As one of the most purist of the RISC architectures that dominated the Unix workstation market in the 80s and 90s, it is widely used as a case study. So I already felt familiar with the outlines of the ISA, I just needed a details reference manual. The JZ4780 implements MIPS32 revision 2 (MIPS32 is based on the 32-bit MIPS ISA from the R3000 with various extensions, some borrowed from the 64-bit line of MIPS processors that began with the R4000). I downloaded the documents from the MIPS32 page on the Imagination site. It's a minor annoyance, but you have to register on the site to download the PDFs. (If I remember correctly, ARM also requires registration. Intel gets a bonus point for making the x86 manuals available for unrestricted download). Then I spent a bit of time browsing the instruction set manual to get my bearings, looking particularly for areas that wouldn't correspond closely to the existing x86 and ARM code generators.

Assembly syntax issues

The Pachuco compiler generates an assembly file rather than producing an executable directly. That assembly file gets passed to gcc, together with one small C file, to produce the executable. That's the only C involved; the rest of Pachuco, including the GC and runtime, are written in Pachuco. (It would be nice to support a truly standalone bootstrap process without relying on an external assembler or any non-Pachuco code. But the ELF executable format is intricate, and writing Pachuco code to generate it directly seems like a distraction from the main goals of the project.)

So it's not quite enough to know the instruction set. I also needed to know the assembly syntax. That would be easy if assembly file only contained instructions, but it also contains directives that describe, well, everything else:

  • the program's static data
  • what goes in which sections
  • fine tuning of the layout of data and instructions in memory
  • debug information (i.e. if you compiled with -g)
  • various non-debug meta-information
  • other miscellaneous assembler settings

Although the gas assembler is ubiquitous on Linux, for a particular target it often conforms to conventions established by a once-dominant Unix (for MIPS, I think that means IRIX). The instruction syntax is usually standardized and well-documented (x86 is an exception, with two different syntaxes in use). But the directives are not: there is a lot of variation for different targets, and if they were ever documented, that documentation is not easily available today. The Machine Dependencies section of the gas manual tends to be rudimentary and incomplete.

So the easiest way to discover the necessary directive syntax is to look at the assembly files generated by gcc with the -S option. By crafting appropriate C programs as running them through gcc -S, you get to see what instructions are used, and more importantly, what directives are involved. For example, here's a simple C program:

extern int var;

int foo(int x)
{
        var = x;
        return 123456789;
}

And here's the MIPS code when compiled with gcc -S foo.c:

        .file   1 "foo.c"
        .section .mdebug.abi32
        .previous
        .gnu_attribute 4, 1
        .abicalls
        .option pic0
        .text
        .align  2
        .globl  foo
        .set    nomips16
        .ent    foo
        .type   foo, @function
foo:
        .frame  $fp,8,$31               # vars= 0, regs= 1/0, args= 0, gp= 0
        .mask   0x40000000,-4
        .fmask  0x00000000,0
        .set    noreorder
        .set    nomacro
        addiu   $sp,$sp,-8
        sw      $fp,4($sp)
        move    $fp,$sp
        sw      $4,8($fp)
        lui     $2,%hi(var)
        lw      $3,8($fp)
        sw      $3,%lo(var)($2)
        li      $2,123404288                    # 0x75b0000
        ori     $2,$2,0xcd15
        move    $sp,$fp
        lw      $fp,4($sp)
        addiu   $sp,$sp,8
        j       $31
        nop

        .set    macro
        .set    reorder
        .end    foo
        .size   foo, .-foo
        .ident  "GCC: (Debian 4.6.3-14) 4.6.3"

As you can see, there can be a lot of directives! With some experimentation, it's possible to get an idea of what the directives do and which ones are really needed in the assembly generated by Pachuco.

OK, that's enough for one post, even if it was all preliminaries. More soon.

Using debootstrap to create a base system for qemu

Recently I wrote about how to debug the Linux kernel running under qemu.. There I showed how to give the emulated kernel to access the host's filesystem. But that access was read-only, as the consequences of giving the guest kernel write access to the filesystem of the host could be drastic. On the other hand, not being able to write to the filesystem limits the kinds of activities that can be debugged.

Fortunately, it's easy to extend the approach to provide a writable filesystem, without going to the trouble of doing a full Linux guest install. The debootstrap tool quickly builds a debian base system in a directory (and you don't even have to be running debian to use it — it's in the fedora repos). As root, do:

# debootstrap --variant=minbase sid guest-root-dir

(The --variant=minbase option requests an absolutely minimal system. Skip it for a not-quite-so-minimal system, or use the --include=pkg1,pkg2,... option to include other debian packages in the system.)

Then the options to qemu are changed slightly to use this new filesystem, and to allow read-write access to it. Also note that you now need to run qemu as root, so that it can set ownership on files within the exposed filesystem

# qemu-system-x86_64 -s -nographic \
        -kernel kernel tree path/arch/x86/boot/bzImage \
        -fsdev local,id=root,path=guest-root-dir,security_model=passthrough \
        -device virtio-9p-pci,fsdev=root,mount_tag=/dev/root \
        -append 'root=/dev/root rw rootfstype=9p rootflags=trans=virtio console=ttyS0 init=/bin/sh'

Then you can connect gdb to qemu as in the previous post.

Debugging the Linux kernel with qemu and gdb

Recently I wanted to run the Linux kernel under a debugger to understand the finer points of the networking code. It's easy to do this using qemu's gdb support, but the the details you are scattered in various places. This post pulls them together.

You can debug the kernel in the context of a full VM image. But qemu provides a more convenient alternative: You can give the guest kernel access to the host filesystem (this uses the 9P remote filesystem, running over the virtio transport rather than a network). That way, we can make use of binaries we have lying around on the host system.

First, we have to build the kernel. Of course, in order to use binaries from the host system, the architecture should match. And to be able to explore the running kernel, gdb needs debug information, so your .config should have:

CONFIG_DEBUG_INFO=y

For filesystem access, you'll need virtio and 9P support:

CONFIG_VIRTIO=y
CONFIG_VIRTIO_PCI=y
CONFIG_NET_9P=y
CONFIG_NET_9P_VIRTIO=y
CONFIG_9P_FS=y

Other than that, the kernel configuration can be bare-bones. You don't need most device drivers. You won't need kernel module support. You won't need normal filesystems (just procfs and sysfs). So you can start from the default kernel config and turn a lot of things off. My .config for 3.17rc5 and x86-64 is here.

If we leverage the host filesystem, we are now ready to launch the kernel under qemu and gdb. I'm using qemu-1.6.2 and gdb-7.7.1 from Fedora 20. Start qemu in one terminal window (as an ordinary user, you don't need root for this) with:

$ qemu-system-x86_64 -s -nographic \
        -kernel kernel tree path/arch/x86/boot/bzImage \
        -fsdev local,id=root,path=/,readonly,security_model=none \
        -device virtio-9p-pci,fsdev=root,mount_tag=/dev/root \
        -append 'root=/dev/root ro rootfstype=9p rootflags=trans=virtio console=ttyS0 init=/bin/sh'

Here:

  • The -s option enables gdb target support.
  • The -kernel option boots the specified kernel directly, rather than going through the normal emulated boot process.
  • -fsdev ...,path=/,readonly,security_model=none tells qemu to give read-only access to the host filesystem (see this follow-up for read-write access).
  • The -append option add kernel command line parameters to tell the kernel to use the 9P filesystem as the root filesystem, to use a serial console (i.e. the terminal where you ran qemu), and to boot directly into a shell rather than into /sbin/init.

You should see the kernel boot messages appear, ending with a shell prompt. The qemu console obeys some key sequences beginning with control-A: Most importantly, C-a h for help and C-a x to terminate qemu.

Then in another terminal run gdb with:

$ gdb kernel tree path/vmlinux
GNU gdb (GDB) Fedora 7.7.1-18.fc20
[...]
Reading symbols from vmlinux...done.
(gdb) target remote :1234
Remote debugging using :1234
atomic_read (v=<optimized out>) at ./arch/x86/include/asm/atomic.h:27
27              return (*(volatile int *)&(v)->counter);

The guest kernel is stopped at this point, so you can set breakpoints etc. before resuming it with continue.

A few caveats:

Because we passed init=/bin/sh on the kernel command line, there was no init system to set up various things that are normally present on a Linux system. For instance, the proc and sys filesystems are missing, and the loopback network interface has not been started. You can fix those issues with the following commands:

sh-4.2# export PATH=$PATH:/sbin:/usr/sbin
sh-4.2# mount -t proc none /proc
sh-4.2# mount -t sysfs none /sys
sh-4.2# ip addr add 127.0.0.1 dev lo
sh-4.2# ip link set dev lo up

Another consequence of starting bash directly from the kernel is this warning:

sh: cannot set terminal process group (-1): Inappropriate ioctl for device
sh: no job control in this shell

Due to this lack of job control, you won't be able to interrupt commands with control-C. So be careful that you don't lose your shell to a command that runs forever!

qemu has a -S option which doesn't start the guest until you connect with gdb and tell it to continue, so you can use gdb to debug the boot process. But I've found that doing that with x86_64 kernels tends to trigger a recent bug in qemu's gdb support. (That bug only affects x86_64 guests, so you can avoid it by building the emulated kernel for i386 or another arch. But then you can't share the filesystem from an x86_64 host.)

Tail Calls and C

Some C compilers, such as gcc and clang, can perform tail call optimization (TCO). But not all calls that are in tail position (using an intuitive notion of what tail position means in C) will be subject to TCO. The documentation for these compilers is obscure about which calls are eligible for TCO. That's disappointing if you wish to write C code which exploits this optimization.

One reason for this obscurity might be a feature of the C language that can prevent TCO even when a call is syntactically in a tail position. Consider a called function that accesses local variables of the calling function via a pointer, e.g.:

void f(void)
{
    int x = 42;
    g(&x);
}

void g(int *p)
{
    printf("%d\n", *p);
}

In this example, TCO cannot be applied to the call to g, because that would have the result that f's local variables are no longer available (having been cleaned off the stack). But the behaviour of this C code is well defined: g should be able to dereference the pointer to access the value stored in x.

That is a trivial example. But the issue doesn't only arise when pointers directly passed to a call in tail position. A pointer to a local variable of a calling function might be exposed through a less obvious route, such as a global variable or the heap. So if a pointer is taken to a local variable anywhere in the calling function, and that local variable remains in-scope at the site of a potential tail call, it might prevent TCO:

void f(void)
{
    int x = 42;

    global_var = &x;
    ...

    /* The compiler cannot perform TCO here,
     * unless it can establish that g does not
     * dereference the pointer in global_var. */
    g();
}

As the comment suggests, it's possible that the compiler can perform some analysis to establish that the called function does not in fact dereference the pointer to the local variable. But given the compilation model typically used by C compilers, it is optimistic to expect them to perform such analysis.

But perhaps there is a way to avoid this issue: If the programmer really wants the call to g to be eligible for TCO, they can make it explicit that the lifetime of x does not overlap the call by introducing a nested scope:

void f(void)
{
    {
        int x = 42;

        global_var = &x;
        ...
    }

    g();
}

Unfortunately, this does not have the desired effect for gcc (4.8.2) and clang (3.3). I have written a simple test suite to explore the TCO capabilities of gcc and clang, and it demonstrates that even with the nested scope, taking the pointer to x defeats TCO for f.

(In fact, even if the contents of the nested scope are hoisted into an inline function called from f, that is still sufficient to contaminate f and prevent TCO, in both gcc and clang.)

I'm not aware of other unrelated features of the C language that can pose an obstacle to TCO. But there are implementation issues in gcc and clang that can prevent TCO. That will be the subject of a future post.

Measuring humidity with a Raspberry Pi

I got a Raspberry Pi a few months ago, and one of the things I wanted to do with it was a bit of hardware hacking (the Raspberry Pi having an easily accessible IO header). But I didn't have a specific project in mind.

So I got a Adafruit Raspberry Pi Breakout Kit, hoping that is would act as a source of inspiration. When the novelty of playing about with LEDs and switches had worn off, I saw that Adafruit also has a very cost effective humidity sensor — the DHT22. The DHT22 is a fully integrated sensor that supplies digital relative humidity and temperature measurements. I have a not entirely frivolous reason to want to measure the humidity levels at home, so this seemed like a good project. But in the end, I chose a different sensor: the HYT-271, (bought from Farnell). The choice was because the DHT22 uses a custom bus protocol, which has to be bit-banged using GPIO pins. Adafruit has an article with sample code to do just that. But that wouldn't leave much for me to learn in the process. The HYT-271 is a little more expensive, but in contrast it uses a standard I²C interface, so it would give me an opportunity to learn something for myself while still staying close to well-trodden paths.

Connecting the HYT-271 to the Raspberry Pi

This part is easy: The four pins of the HYT-271 are wired to the corresponding pins on the Raspberry Pi's IO header (SDA, SCL, GND, and VDD to one of the 3.3V pins).

Because I²C is an open-drain bus, the SDA and SCL lines need pull-up resistors. The Raspberry Pi schematics show that it incorporates 1.8KΩ pull-up resistors on these lines, so external pull-ups are unnecessary. In fact, 1.8KΩ is close to the lowest value allowed for a 3.3V I²C bus (see this page), so it seems unlikely you would ever use external pull-ups with a Raspberry Pi.

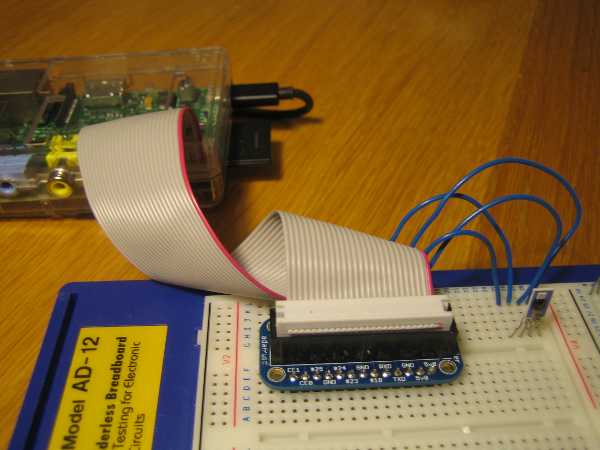
I made the connections via the breakout kit and a breadboard. The pitch on the HYT-271's pins is 0.05 inches, but the pins are long enough that they can be carefully splayed to fit in the 0.1 inch pitch of a breadboard:

A HYT-271 humidity sensor connected to a Raspberry Pi

Enabling the I²C drivers

I'm running raspian on my Raspberry Pi. Using the I²C bus involves a small amount of configuration. I took these steps from this page about connecting to an I²C ADC. As root:

  1. Add i2c-dev to the end of /etc/modules (this allows userspace programs to access the I²C bus).
  2. Comment out the line in /etc/modprobe.d/raspi-blacklist.conf that says blacklist i2c-bcm2708 (apparently it is blacklisted simply because it is thought few users will need it).
  3. Install i2c-tools:
    apt-get install i2c-tools
  4. Add the relevant users to the i2c group, so that they can access the I²C devices:
    adduser USER i2c
  5. Reboot so that these changes take effect:
    reboot

Once that's done, we can use i2c-detect to check whether the Raspberry Pi can see the HYT-271:

pi@raspberrypi /tmp $ i2cdetect -y bcm2708_i2c.1
     0  1  2  3  4  5  6  7  8  9  a  b  c  d  e  f
00:          -- -- -- -- -- -- -- -- -- -- -- -- --
10: -- -- -- -- -- -- -- -- -- -- -- -- -- -- -- --
20: -- -- -- -- -- -- -- -- 28 -- -- -- -- -- -- --
30: -- -- -- -- -- -- -- -- -- -- -- -- -- -- -- --
40: -- -- -- -- -- -- -- -- -- -- -- -- -- -- -- --
50: -- -- -- -- -- -- -- -- -- -- -- -- -- -- -- --
60: -- -- -- -- -- -- -- -- -- -- -- -- -- -- -- --
70: -- -- -- -- -- -- -- --

The “28” is the HYT-271, which uses I²C address 0x28, so things are looking good.

(The bus name bcm2708_i2c.1 is correct for the Raspberry Pi Revision 2. On Revision 1 boards, the I²C bus on the IO header is bcm2708_i2c.0.)

Ideally at this point we would be able to use the other i2c-tools commands to verify that the HYT-271 is functioning. Unfortunately, despite the name, i2c-tools has a strong emphasis on SMBus rather than generic I²C, and its i2cget and i2cset commands cannot issue raw I²C read and write transactions. So we need some custom code to proceed further.

Code

Unfortunately, the documentation for the HYT series is lacking. The datasheets do not describe what I²C transactions are needed to get a reading from the sensor. Sample code is available on the hygrochip.com site, but the Arduino code seems to have some issues. So I examined their sample BASIC code to produce something that worked. In order to get a reading, you have to:

  1. Do a write transaction to begin a measurement (the data written seems to be irrelevant).
  2. Wait 60ms (if you do a read transaction immediately, you will get back the values for the previous measurement).
  3. Read the 4 bytes containing the humidity and temperature measurements.

(The sample Arduino code misses out steps 1 and 2, which will cause it to return the same values all the time.)

You can find my C program on github:

pi@raspberrypi /tmp/hygrochip-linux $ ./hyt-read
44.906307 21.798206

Shift Instructions

The bitwise shift instructions in the most common instruction set architectures have a quirk.

You can observe this with the following C program. It shifts 1 left by zero bits, then one bit, then two bits, then three bits, etc., printing the result:

#include <stdio.h>

int main(void) {
	unsigned int i;
	for (i = 0; i < 128; i++)
		printf("%u\n", 1U << i);

	return 0;
}

As you might expect, this program outputs increasing powers of two. But what happens when the shift count grows to the point where the set bit gets shifted off the left end of an unsigned int? A reasonable guess is that result should become zero, and stay at zero as the shift count increases further.

But if you compile and run the program on x86, the actual results look like this when plotted on a chart:

As expected, the result initially follows the exponential curve of powers of two. But when we reach the 1U << 32 case, and we might have expected a result of 0, the result actually returns to 1, and the function becomes periodic. The explanation for this is that the x86 SHL instruction only uses the bottom 5 bits of the shift count, and so the shift count is treated modulo 32.

By the way, if you try a similar experiment in languages other than C or C++, you probably won't see this behaviour. Only in C/C++ is the shift operation defined loosely enough that a compiler can use the unadorned machine instruction. Implementations of other languages do extra work to make their shift operations operate less surprisingly, and more consistently across different instruction set architectures.

Is this just a peculiar quirk of x86? Well, ARM does something similar. Here's a chart of the same program's output when running on ARM:

ARM's Logical shift left by register instruction operand type uses the bottom 8 bits of the shift count register. So 1U << i rises from one to 1U << 32, then drops to zero as the set bit is shifted off the end of the unsigned int. But then 1U << 256 returns to one, and the function repeats.

Why do x86 and ARM behave in this way? Historical reasons. Here's a note from the definition of the SHL instruction in Intel's Software Developer's Manual:

IA-32 Architecture Compatibility

The 8086 does not mask the shift count. However, all other IA-32 processors (starting with the Intel 286 processor) do mask the shift count to 5 bits, resulting in a maximum count of 31. This masking is done in all operating modes (including the virtual-8086 mode) to reduce the maximum execution time of the instructions.

This is clearly an old historical note (and not just because it is outdated — in x86-64, 64-bit shift operations mask the shift count to 6 bits). The cycle counts for shift instructions on the 8086 varied with the shift count, presumably because it implemented them with a microcode loop. But in later Intel x86 processors, shift instructions take a constant number of cycles, so the idea of a maximum execution time is an anachronism. And clearly it is never actually necessary for the hardware to do a shift by more than 32 or 64 bits: larger shift counts can be handled by simply zeroing the result (and detection of a large shift count can be done in parallel with a modulo shift, so it seems unlikely that this would be problematic in circuit design terms). This is confirmed by the SSE shift instructions (PSLL* etc.) which do not mask the shift count.

So it seems unlikely that a green-field instruction set would have these kind of quirks. They originated in processor designs many years ago that were constrained in the number of available transistors, and have been retained for compatibility.